Wednesday, July 18, 2012
Making Our Home a Home Sweet Home: Part 9 – From nasty to nice
In previous posts we have discussed the stack effect, and insulated/sealed lids on the top or bottom of a house. In Part 7, we took care of the top part, and since we added the ventilation provision with an ERV, there is no longer any concern about unhealthy conditions due to a tighter house. I guess the pictures speak for the title. I didn’t stop with just a lid on the top of the house because I feel strongly that your crawl space is part of your house, and whatever it lets in is welcome to enter the house as well. That was particularly painful when I looked in and found this:
A vented crawl space is dependent upon the whims of wind currents and variable relative humidities of that air. Warmer, humid summer air tends to cool upon entering a crawl space, which means moisture can condense on metal or other surfaces, and promote growth of various kinds. A poorly installed or vapor barrier means gallons of moisture are evaporating up into the space (10 gallons per 1000 sqft of exposed soil in a 24 hour period), putting unnecessary load on heating and air systems, and bringing unnecessary yuck up into the house. That’s why I did this:
You’ll see that I have not yet removed the fiberglass insulation. With spray foam insulation on the exterior walls, the floor insulation is now unnecessary, and actually hinders the maintenance of a consistent temperature between the spaces. But, it’s expensive to have others do, and I haven’t gotten to it yet! I know you have projects like that.
While getting ready for the crawl space, I realized, while installing a new French door, that there was no insulation whatsoever in the pine paneled walls in our 50 year-old addition off the back of the house. A foam crew was already there, and a few days later, we had a delightfully insulated space (only walls in the house!), which we’re now converting to a bed, bath and mudroom for the growing family.
Thursday, July 12, 2012
Making Our Home a Home Sweet Home: Part 8 – Fresh Air
In Part 5 below we explored why a new mantra of the building science community is: “Air tight, ventilate right.” Letting random air flow through a house is potentially bad for health (drawing in crawl space air, soil gases, etc.), and makes heating and air systems work harder. Air tightness reduces natural air exchange; oxygen that gets used by appliances and people does not get replaced as quickly as in a leaky building. That can result in trouble breathing and sleeping, and can present a real problem if there are combustion appliances in the home… unless you make clear and appropriate provisions for bringing fresh air into the house.
So, since we had begun to tighten up the house (with a sealed and insulated lid via spray foam on the roof deck), we needed to ensure we were getting an appropriate volume of healthy, fresh air into the house. There are a couple of ways to do this, with varying levels of control.
1. An occupancy sensor with timer for bath exhaust fans, sometimes paired with a passive inlet through the exterior wall
2. An Energy or Heat Recovery Ventilator (ERV or HRV)
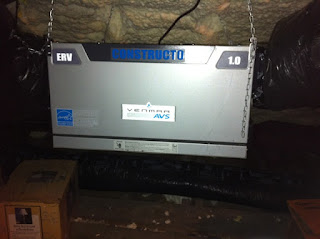
There are merits to both, and cost implications. While option 1 is less expensive, it still brings in, through a simple filter, whatever air is outside. Since this is most critical in months we don’t have the windows open, that air could be 100º/95% humidity August air, or 20º/30% relative humidity February air. I chose an ERV, pictured here, because it not only filters the air that comes in, it captures or recovers some of the energy that is lost in the air exchange equation. An ERV takes air out of the house (typically from bathrooms, or maybe a utility or mudroom), and delivers fresh air from outside typically to bedrooms (because that is where we spend the most time in our homes). But, when it does this, it runs the two volumes of air past each other so that both sensible (air temperature) and latent (stored in moisture) heat can be transferred between the volumes of air. ERVs are typically about 60-70% efficient, meaning that if I have 68º/50% RH air inside, and its bringing in 18º/30% RH outside air (a 50º/20% spread), the 18º/30% air will be warmed to somewhere around 50º/42%RH before being delivered to my bedrooms. This eases the load on our heating and air system while bringing us the fresh air that helps us breath easier and sleep better. ERVs or HRVs are typically either installed in line with heating and air systems, or separate, with independent controls. We elected for the separate installation. The day it was installed I noticed an immediate difference the moment I walked in the door, a fresher feel, and diminished odors from the various things that can collect in a young family’s home!
A thorough discussion about ventilation with recovery ventilation systems can be found here:
http://www.greenbuildingadvisor.com/blogs/dept/musings/hrv-or-erv
Subscribe to:
Comments (Atom)


