Thursday, August 30, 2012

Making our Home a Home Sweet Home - Part 10: Why pay to heat and cool your home when you’re not even there?

If you’re looking for a really low hanging fruit to save some money on utility bills, simply head out and buy a programmable thermostat at your local home improvement store.  They are relatively easy to install, with a couple standard tools, if you follow the instructions (which is of course pretty important).
Sometimes I wish I would have made all of the improvements I’ve mentioned in this series in sequence with enough space in between the phases to see what kind of impact each one had on savings, but in this case my impatience outweighed my need for science.  Once you learn something about building science, the things in your own home begin to glare at you.  I just want to make those things go away.
While I don’t have clear numbers for you on what the programmable thermostat saved us at my home, the EPA publishes some industry averages.  They say folks save an average of $180 a year by replacing a conventional thermostat with a programmable one.  It is certainly part of the story that resulted in our receiving a letter from PSNC that our equal pay gas bill would be $13 per month instead of $43.  Some of that is attributed to better insulation and air-sealing, but the thermostat ensures that our HVAC system can relax during times we are either not in the house, or when we are asleep.  Those are the largest proportions of time in the life of a house, and big opportunities for savings.
There is a range of programmable thermostats, from ones that have standard times and periods of day predetermined without customizability, to ones that can link up with your wifi network so you can control them with your smart phone when you’re out of town, across the street.  The one you see here cost me about $70.  But, as you can see from the EPA information above, it pays for itself, on average, in less than half a year.  That’s both smart and puts money back in your pocket.
What are you waiting for?  I was proud of my accomplishment.  You will be, too!
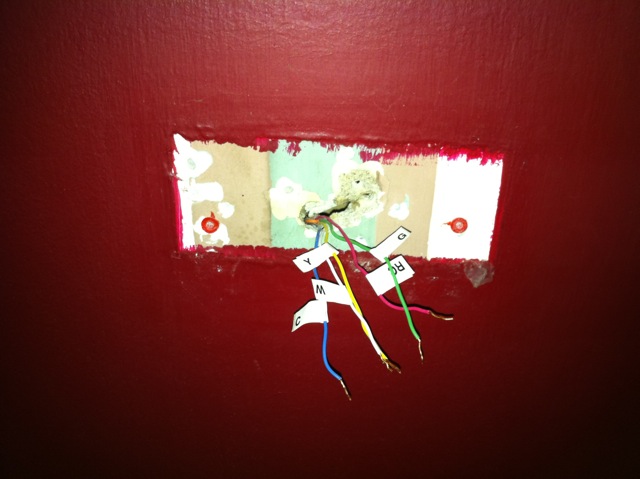

Remove old thermostat
Wire and mount new thermostat
Program and Save!!!


Wednesday, July 18, 2012

Making Our Home a Home Sweet Home: Part 9 – From nasty to nice


In previous posts we have discussed the stack effect, and insulated/sealed lids on the top or bottom of a house.  In Part 7, we took care of the top part, and since we added the ventilation provision with an ERV, there is no longer any concern about unhealthy conditions due to a tighter house.  I guess the pictures speak for the title.  I didn’t stop with just a lid on the top of the house because I feel strongly that your crawl space is part of your house, and whatever it lets in is welcome to enter the house as well.  That was particularly painful when I looked in and found this:

A vented crawl space is dependent upon the whims of wind currents and variable relative humidities of that air.  Warmer, humid summer air tends to cool upon entering a crawl space, which means moisture can condense on metal or other surfaces, and promote growth of various kinds.  A poorly installed or vapor barrier means gallons of moisture are evaporating up into the space (10 gallons per 1000 sqft of exposed soil in a 24 hour period), putting unnecessary load on heating and air systems, and bringing unnecessary yuck up into the house.  That’s why I did this:


You’ll see that I have not yet removed the fiberglass insulation.  With spray foam insulation on the exterior walls, the floor insulation is now unnecessary, and actually hinders the maintenance of a consistent temperature between the spaces.  But, it’s expensive to have others do, and I haven’t gotten to it yet! I know you have projects like that.

While getting ready for the crawl space, I realized, while installing a new French door, that there was no insulation whatsoever in the pine paneled walls in our 50 year-old addition off the back of the house.  A foam crew was already there, and a few days later, we had a delightfully insulated space (only walls in the house!), which we’re now converting to a bed, bath and mudroom for the growing family.

Thursday, July 12, 2012

Making Our Home a Home Sweet Home: Part 8 – Fresh Air


In Part 5 below we explored why a new mantra of the building science community is: “Air tight, ventilate right.” Letting random air flow through a house is potentially bad for health (drawing in crawl space air, soil gases, etc.), and makes heating and air systems work harder.  Air tightness reduces natural air exchange; oxygen that gets used by appliances and people does not get replaced as quickly as in a leaky building.  That can result in trouble breathing and sleeping, and can present a real problem if there are combustion appliances in the home… unless you make clear and appropriate provisions for bringing fresh air into the house.
So, since we had begun to tighten up the house (with a sealed and insulated lid via spray foam on the roof deck), we needed to ensure we were getting an appropriate volume of healthy, fresh air into the house.  There are a couple of ways to do this, with varying levels of control.
1.     An occupancy sensor with timer for bath exhaust fans, sometimes paired with a passive inlet through the exterior wall
2.     An Energy or Heat Recovery Ventilator (ERV or HRV)
There are merits to both, and cost implications.  While option 1 is less expensive, it still brings in, through a simple filter, whatever air is outside.  Since this is most critical in months we don’t have the windows open, that air could be 100º/95% humidity August air, or 20º/30% relative humidity February air.  I chose an ERV, pictured here, because it not only filters the air that comes in, it captures or recovers some of the energy that is lost in the air exchange equation.  An ERV takes air out of the house (typically from bathrooms, or maybe a utility or mudroom), and delivers fresh air from outside typically to bedrooms (because that is where we spend the most time in our homes).  But, when it does this, it runs the two volumes of air past each other so that both sensible (air temperature) and latent (stored in moisture) heat can be transferred between the volumes of air.  ERVs are typically about 60-70% efficient, meaning that if I have 68º/50% RH air inside, and its bringing in 18º/30% RH outside air (a 50º/20% spread), the 18º/30% air will be warmed to somewhere around 50º/42%RH before being delivered to my bedrooms.  This eases the load on our heating and air system while bringing us the fresh air that helps us breath easier and sleep better. ERVs or HRVs are typically either installed in line with heating and air systems, or separate, with independent controls.  We elected for the separate installation.  The day it was installed I noticed an immediate difference the moment I walked in the door, a fresher feel, and diminished odors from the various things that can collect in a young family’s home!


A thorough discussion about ventilation with recovery ventilation systems can be found here:
http://www.greenbuildingadvisor.com/blogs/dept/musings/hrv-or-erv


Wednesday, April 11, 2012

Making Our Home a Home Sweet Home: Part 7 – Implementing the Plan

Phase 1 - Put a lid on it

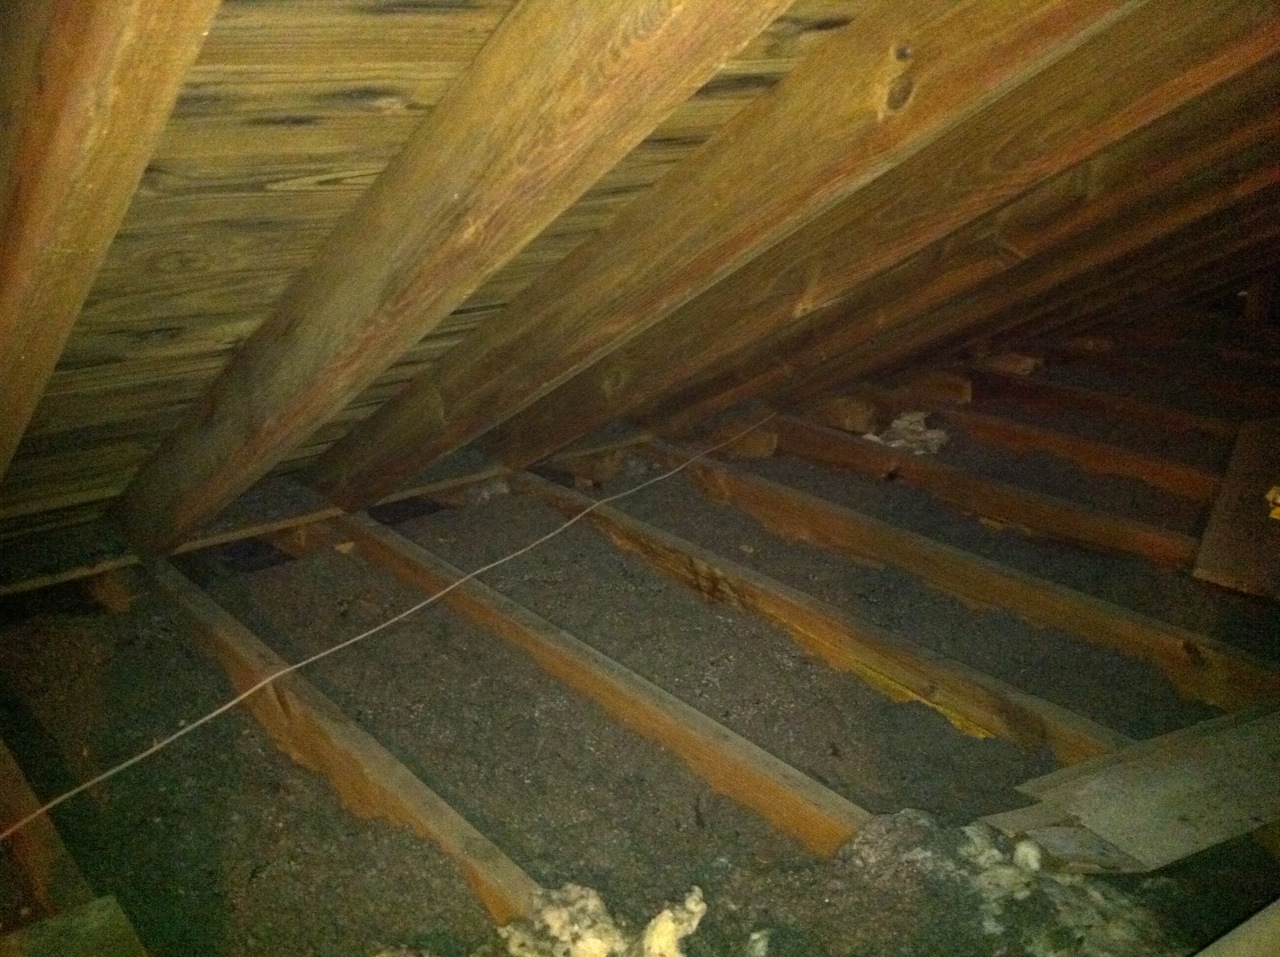
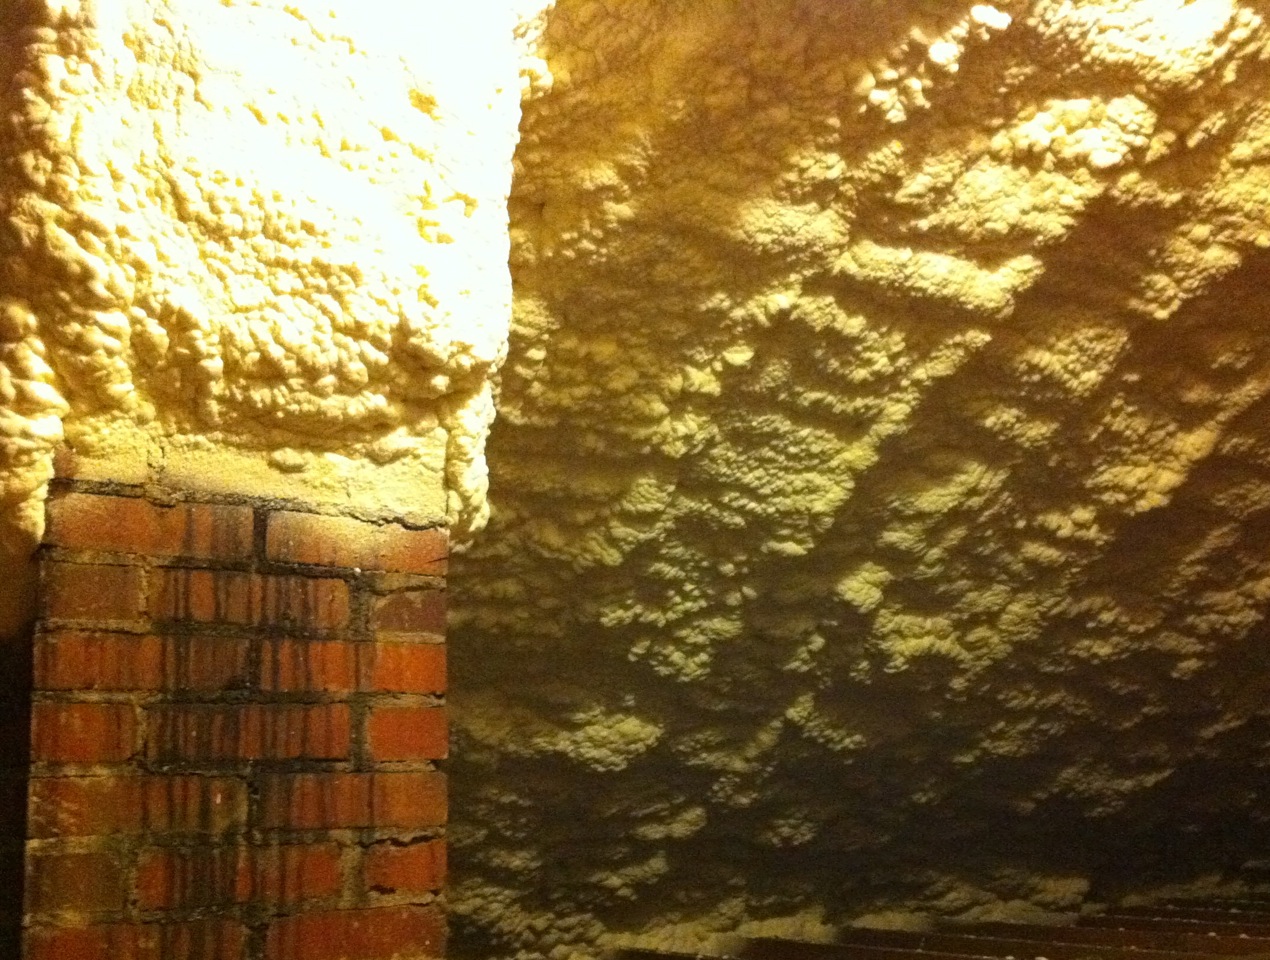
We have a short, but fairly large space in our attic.  There was a sorry excuse for insulation, three inches of rock wool, compressed and shifted around by critters, over the 70-year life of the home.  There were a couple of options on the table.  We could blow in a bunch of fiberglass insulation in the spaces without flooring, and then build up a bunch of rigid board insulation on the floor, and lay a new layer of plywood on top of that to retain storage.  All fine and good, in theory, but it’s already a short space, and to get a reasonable amount of insulation in there, we’d have taken up a lot of headspace, and therefore reduced storage space as well.  I did not want to change the space, and it actually would have been a fair amount of mess, noise and labor to get all the material in there to insulate the floor.  So, I elected to spray the roof deck with open cell foam. 

That has not only helped stabilize temperatures throughout the house, it has eliminated the dread of going up into 140 degree heat to find the high chair, or the next set of clothes, for the baby in the house.  And while we had to move our stored items, either out or into the center of the space for workers to get around, we didn’t have to take it all out (as we would have with the floor option), and we got to move most of it back (it was also an excuse to get rid of junk!).  Plus, it eliminated the need to depend on a fan, or wind, or other air circulation to “cool” our attic in the summertime.  Now that the space is defined as within thermal envelope, it simplifies its use, and makes it easier to manage the space.  We don’t have to worry at all about air leaks through the ceiling anymore, because there’s an insulated lid at the roof.

Top Photo: Attic before
Bottom Photo: Attic after
Next item: ERV. Stay tuned!

Sunday, April 8, 2012

Making Our Home a Home Sweet Home: Part 6 – The Plan

I didn’t say it explicitly before, but have implied that our decision-making addresses the house as a system from the outside in.  You can have some fancy equipment and appliances, or even insulation, but without an appropriately designed shell of the building even the best heating and air equipment can struggle (along with the occupants).  Of course, under most circumstances, it may not be practical, or likely, that you’re going to rip out everything and start over (although it’s really exciting when you do get that chance!).  But when you do make major changes, you need to consider how the behavior of the equipment will change, and its longevity as a result. 

To be fair, too, there are some things that are not so inextricably tied to the skin.  Some are more related to behavior, the energy load that results from lifestyle, preference and convenience of occupants, and can be done without too many impactful side effects, good candidates for do-it-yourself, or honey-do lists. 

All things considered, here’s the plan, summarized.  I broke them out into two categories.  One that lists things that don’t require careful thought about how they impact the whole system (Non-integrated), and ones that do (Integrated):

Phase 1
Non-integrated
Install electric water heater blanket
Insulate pipes within two feet of tank
Install programmable thermostat
Replace washer with ENERGY STAR washer

Integrated
Install open cell spray foam underside of roof deck
Install variable speed ERV
Seal/reseal exterior doors
Seal exterior outlets
Seal crawl space with white reinforced liner
Determine method to insulate exterior walls
Install mechanical air supply to crawl space
Replace crawl space access doors with sealed and insulated doors

Future/Phase 2
Non-integrated
Replace fridge with ENERGY STAR fridge (that might be all too soon!)
Replace hot water heater with high efficiency water heater, or solar water heater
(Buy a minivan to replace the station wagon!)

Integrated
Remove exterior wall plaster or drill and pump exterior walls with spray foam or dense-packed cellulose
Replace shingles with ENERGY STAR related shingles
Replace gas pack HVAC unit with geothermal heat pump, or high SEER conventional heat pump

Details about key items to follow in future posts.

Wednesday, April 4, 2012

Making Our Home a Home Sweet Home: Part 5- Air Apparent

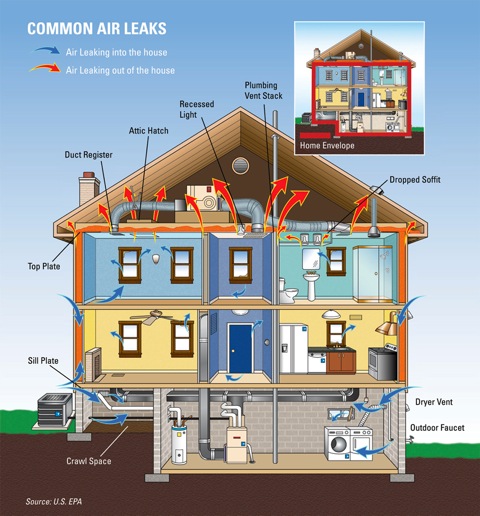
Last time I mentioned a bit about the progress of building shelters, first keeping larger critters out, then water—both ways of tightening up a home.  Air is next.  There are three reasons for this: moisture, temperature, and pollution.  Air brings all these things, most often in rather different quantities than indoors, which adds a burden to the house, likely to its occupants, and also to its heating and cooling equipment.  Conventional building wisdom has said, “a house needs to breathe.”  This is technically true.  But, then, ask: “How and when do you get fresh air?”  Like the body, a clear opening (mouth or nose or vent) and a controlled pressure regulator (diaphragm or fan) lets you know.  The air that comes into the body is tempered and filtered by the nasal passages so its contents are not so shocking to its more delicate and vulnerable interior: the lungs.  In a home, mechanical ventilation can do this work.  Like not breathing deprives lungs of fresh air, without this provision, air moves (or doesn’t!) unfiltered at the whims of wind and convection currents.  Convection currents are caused by warmer air rising or cold air sinking.  When air rises inside a home, it will find its way out the top, wherever it can, through the attic access, the light fixtures, or any other unsealed opening in the ceiling.  By the general nature of air pressure, when air leaves the top of my house, it will be replaced by other air. Where does that air come from?  Bad windows and poorly sealed doors, exterior outlets, and leaky floors allow outside and/or crawl space air to enter the house.  This is unwanted, unhealthy, unpredictable, and uncontrollable airflow—better put a lid on it.


To jump ahead a little bit, we decided to feed two birds with one scone and seal and insulate in one step with spray foam on the roof deck, and in our uninsulated back room (more on that, later).  The Building Performance Institute recommends adding mechanical ventilation when tightening more than 15 percent of the exterior of a building, so with our spray foam decision, mechanical ventilation would provide a choice to maintain a healthy interior.  The options were a bathroom exhaust fan on a timer (which requires repeated human input) paired with a passive and filtered vent opening through a wall to both exhaust and bring in an appropriate amount of air, or an Energy or Heat Recovery Ventilator (ERV, HRV), which can be set to run automatically.  More on that decision soon!

Tuesday, April 3, 2012

Making Our Home a Home Sweet Home: Part 4 – If Only We Could Start Over

A house is a system.  It is made up of separate systems that have unique functions, but, like we’re discovering in medicine, thanks to Patch Adams and many others, you do best when you treat the patient, not just the disease—the whole rather than the individual pieces.  How the individual components interact with each other is critical in the overall success of an organism, or a building.  Prescribing treatment for one ailment may cause side effects.  Yet, both in home comfort improvement and in medicine, budgets (of money, time and tolerance) may limit the possibilities.  We want the house to succeed—but more so for the folks who call it home.  That takes thoughtful prioritization.

Like an organism, the way a house interacts with its surroundings—what it lets in and keeps out, and when—determines its comfort, performance, and longevity.  Like a body’s skin, the exterior of a home must manage water, moisture, air (and all that’s in it), temperature, light, sound, and even other organisms introduced by its environment.  Bodies and homes need fresh air, fresh water, and a healthy amount of sunlight.  The respiratory and digestive systems and skin are wonderfully capable of ensure healthy quantities of all of these, but, like a building, it requires proper user input.  If not, we know what can happen.  Some bodies are able to handle negligence better than others.  Homes are the same way, and can easily be designed to control these elements.  Or, redesigned, as best we can.  If not, deterioration and discomfort move in.

So, if we can’t start over, we still have the chance to make what we have work better.  For centuries, as human shelter progressed, keeping critters (the big ones) out was job one.  After we got the hang of that, water was next.  For some houses, it still is next.  We all know if we have a leak in the roof how much more an emergency that is than an air leak!  And, rightly so, because water is destructive.

But, once we get water out of the picture, air is next.