
Friday, August 31, 2012
Information Can Change Behavior - An Energy Use Story
I keep the information tracking system in my Volkswagen TDI set to average MPG. When I get a little heavy on the accelerator (which happens from time to time), my mileage reflects my driving. When it drops below 40 MPG, I change my behavior because that threshold (for some reason) is important to me.
We recently started the install of our energy monitoring system for our office building at 502 Rigsbee. As of today, we can track the total energy generated by the PV system and the building’s total energy use. Our plan is to have full circuit-by-circuit monitoring in place in the coming weeks. The energy geek in all of us can check it out at:
http://egauge3135.egaug.es/
I’ve been on a rampage about how and when we use energy ever since we started to see this information. Why is our building using so much power at night when we have moderate and comfortable evenings with outside temperatures lower than the settings on our thermostats? What else is using power besides our HVAC system? Look at that spike in energy use during our grand opening party! A few hundred people really heat up the place. Why is that computer monitor on when not in use? Are our motion sensors working correctly and shutting off our lights when we forget to turn them off? How much power does our UV rainwater filter use? Yes, I can drive myself a little crazy with this stuff, but the information allows us to take care of three major items. One, we can assure the systems we have installed are functioning properly as designed and installed. Two, we can address those items and see direct results. Three, we can modify behavior to assure we are using the facility to assure the greatest efficiency.
When you have data, all these things come to the forefront. When our building is using more energy at night than I think it should, I use the information and investigate. If you know where the waste is, you can change the right things. Without the information, energy guzzlers just keep quietly guzzling often with little real benefit.
Although we are not yet showing the power generated by the wind turbines and we are not yet seeing individual circuit use, we have enough information to start changing behavior and tweaking systems. With the monitoring system fully functional, we can continue to tune our habits and systems for maximum benefit and minimal energy use.
Information changes behavior for the better.
Making Our Home a Home Sweet Home - Part 11: ENERGY STAR washer
 |
| New stackable VRT washer and dryer |
Thursday, August 30, 2012
Making our Home a Home Sweet Home - Part 10: Why pay to heat and cool your home when you’re not even there?
Sometimes I wish I would have made all of the improvements I’ve mentioned in this series in sequence with enough space in between the phases to see what kind of impact each one had on savings, but in this case my impatience outweighed my need for science. Once you learn something about building science, the things in your own home begin to glare at you. I just want to make those things go away.
While I don’t have clear numbers for you on what the programmable thermostat saved us at my home, the EPA publishes some industry averages. They say folks save an average of $180 a year by replacing a conventional thermostat with a programmable one. It is certainly part of the story that resulted in our receiving a letter from PSNC that our equal pay gas bill would be $13 per month instead of $43. Some of that is attributed to better insulation and air-sealing, but the thermostat ensures that our HVAC system can relax during times we are either not in the house, or when we are asleep. Those are the largest proportions of time in the life of a house, and big opportunities for savings.
There is a range of programmable thermostats, from ones that have standard times and periods of day predetermined without customizability, to ones that can link up with your wifi network so you can control them with your smart phone when you’re out of town, across the street. The one you see here cost me about $70. But, as you can see from the EPA information above, it pays for itself, on average, in less than half a year. That’s both smart and puts money back in your pocket.
What are you waiting for? I was proud of my accomplishment. You will be, too!
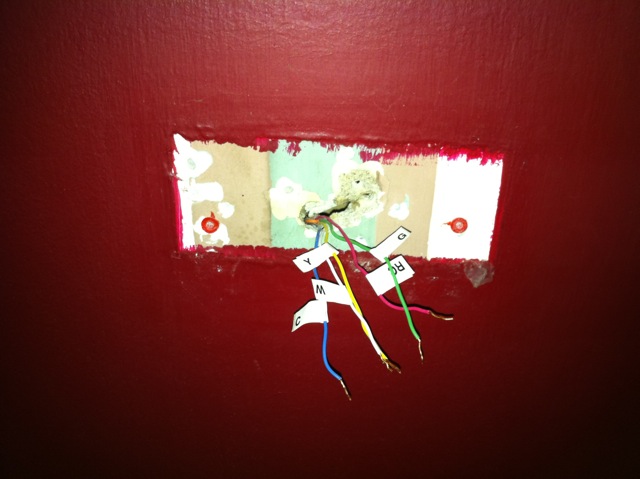 | |
| Remove old thermostat |
 |
| Wire and mount new thermostat |
 |
| Program and Save!!! |
Wednesday, July 18, 2012
Making Our Home a Home Sweet Home: Part 9 – From nasty to nice
In previous posts we have discussed the stack effect, and insulated/sealed lids on the top or bottom of a house. In Part 7, we took care of the top part, and since we added the ventilation provision with an ERV, there is no longer any concern about unhealthy conditions due to a tighter house. I guess the pictures speak for the title. I didn’t stop with just a lid on the top of the house because I feel strongly that your crawl space is part of your house, and whatever it lets in is welcome to enter the house as well. That was particularly painful when I looked in and found this:

A vented crawl space is dependent upon the whims of wind currents and variable relative humidities of that air. Warmer, humid summer air tends to cool upon entering a crawl space, which means moisture can condense on metal or other surfaces, and promote growth of various kinds. A poorly installed or vapor barrier means gallons of moisture are evaporating up into the space (10 gallons per 1000 sqft of exposed soil in a 24 hour period), putting unnecessary load on heating and air systems, and bringing unnecessary yuck up into the house. That’s why I did this:


You’ll see that I have not yet removed the fiberglass insulation. With spray foam insulation on the exterior walls, the floor insulation is now unnecessary, and actually hinders the maintenance of a consistent temperature between the spaces. But, it’s expensive to have others do, and I haven’t gotten to it yet! I know you have projects like that.
While getting ready for the crawl space, I realized, while installing a new French door, that there was no insulation whatsoever in the pine paneled walls in our 50 year-old addition off the back of the house. A foam crew was already there, and a few days later, we had a delightfully insulated space (only walls in the house!), which we’re now converting to a bed, bath and mudroom for the growing family.

Thursday, July 12, 2012
Making Our Home a Home Sweet Home: Part 8 – Fresh Air
In Part 5 below we explored why a new mantra of the building science community is: “Air tight, ventilate right.” Letting random air flow through a house is potentially bad for health (drawing in crawl space air, soil gases, etc.), and makes heating and air systems work harder. Air tightness reduces natural air exchange; oxygen that gets used by appliances and people does not get replaced as quickly as in a leaky building. That can result in trouble breathing and sleeping, and can present a real problem if there are combustion appliances in the home… unless you make clear and appropriate provisions for bringing fresh air into the house.
So, since we had begun to tighten up the house (with a sealed and insulated lid via spray foam on the roof deck), we needed to ensure we were getting an appropriate volume of healthy, fresh air into the house. There are a couple of ways to do this, with varying levels of control.
1. An occupancy sensor with timer for bath exhaust fans, sometimes paired with a passive inlet through the exterior wall
2. An Energy or Heat Recovery Ventilator (ERV or HRV)
There are merits to both, and cost implications. While option 1 is less expensive, it still brings in, through a simple filter, whatever air is outside. Since this is most critical in months we don’t have the windows open, that air could be 100º/95% humidity August air, or 20º/30% relative humidity February air. I chose an ERV, pictured here, because it not only filters the air that comes in, it captures or recovers some of the energy that is lost in the air exchange equation. An ERV takes air out of the house (typically from bathrooms, or maybe a utility or mudroom), and delivers fresh air from outside typically to bedrooms (because that is where we spend the most time in our homes). But, when it does this, it runs the two volumes of air past each other so that both sensible (air temperature) and latent (stored in moisture) heat can be transferred between the volumes of air. ERVs are typically about 60-70% efficient, meaning that if I have 68º/50% RH air inside, and its bringing in 18º/30% RH outside air (a 50º/20% spread), the 18º/30% air will be warmed to somewhere around 50º/42%RH before being delivered to my bedrooms. This eases the load on our heating and air system while bringing us the fresh air that helps us breath easier and sleep better. ERVs or HRVs are typically either installed in line with heating and air systems, or separate, with independent controls. We elected for the separate installation. The day it was installed I noticed an immediate difference the moment I walked in the door, a fresher feel, and diminished odors from the various things that can collect in a young family’s home!
A thorough discussion about ventilation with recovery ventilation systems can be found here:
http://www.greenbuildingadvisor.com/blogs/dept/musings/hrv-or-erv


Wednesday, April 11, 2012
Making Our Home a Home Sweet Home: Part 7 – Implementing the Plan
Phase 1 - Put a lid on it
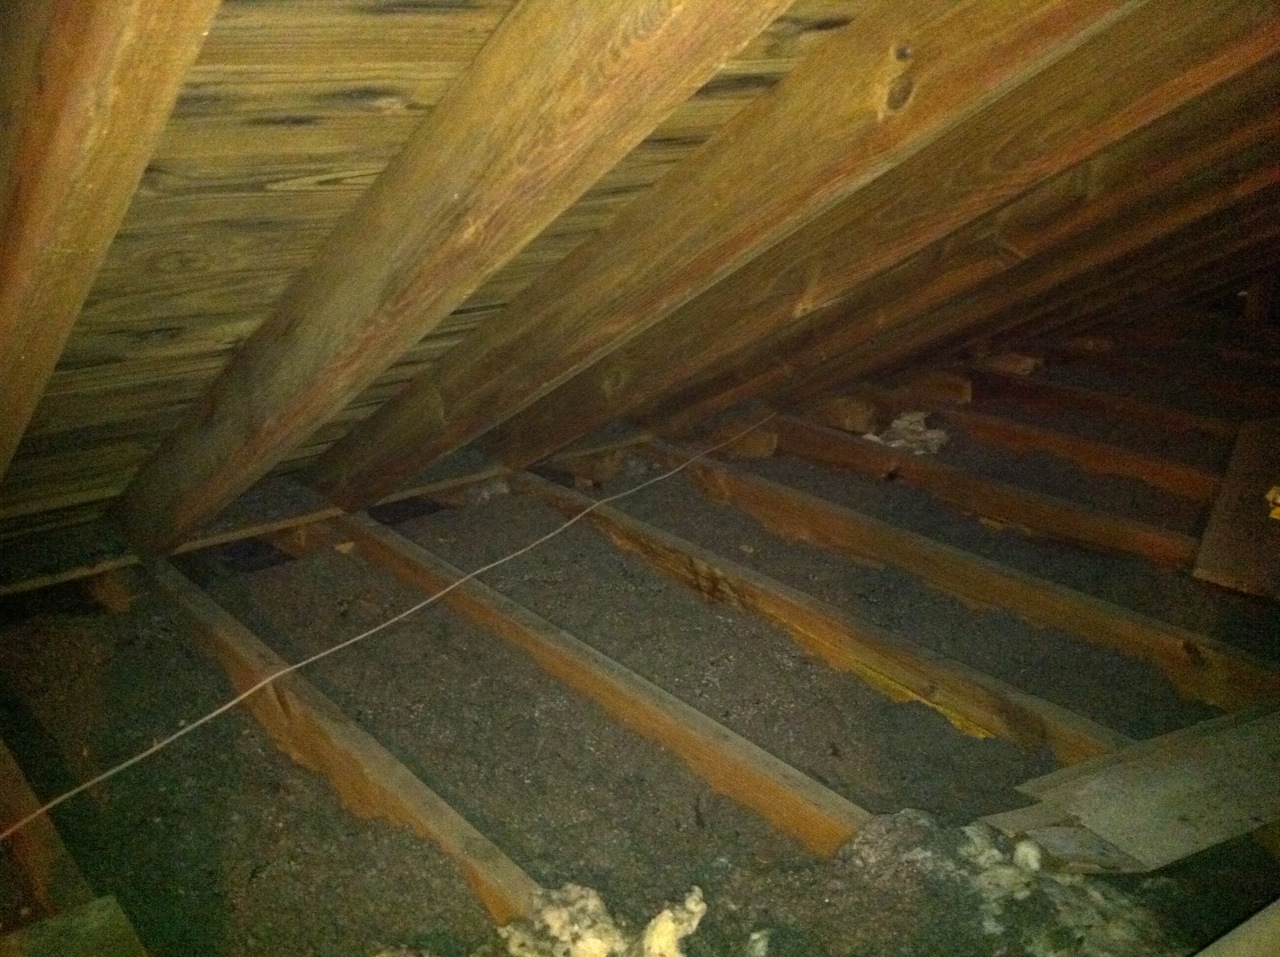
We have a short, but fairly large space in our attic. There was a sorry excuse for insulation, three inches of rock wool, compressed and shifted around by critters, over the 70-year life of the home. There were a couple of options on the table. We could blow in a bunch of fiberglass insulation in the spaces without flooring, and then build up a bunch of rigid board insulation on the floor, and lay a new layer of plywood on top of that to retain storage. All fine and good, in theory, but it’s already a short space, and to get a reasonable amount of insulation in there, we’d have taken up a lot of headspace, and therefore reduced storage space as well. I did not want to change the space, and it actually would have been a fair amount of mess, noise and labor to get all the material in there to insulate the floor. So, I elected to spray the roof deck with open cell foam.
That has not only helped stabilize temperatures throughout the house, it has eliminated the dread of going up into 140 degree heat to find the high chair, or the next set of clothes, for the baby in the house. And while we had to move our stored items, either out or into the center of the space for workers to get around, we didn’t have to take it all out (as we would have with the floor option), and we got to move most of it back (it was also an excuse to get rid of junk!). Plus, it eliminated the need to depend on a fan, or wind, or other air circulation to “cool” our attic in the summertime. Now that the space is defined as within thermal envelope, it simplifies its use, and makes it easier to manage the space. We don’t have to worry at all about air leaks through the ceiling anymore, because there’s an insulated lid at the roof.

 Top Photo: Attic before
Bottom Photo: Attic after
Next item: ERV. Stay tuned!
We have a short, but fairly large space in our attic. There was a sorry excuse for insulation, three inches of rock wool, compressed and shifted around by critters, over the 70-year life of the home. There were a couple of options on the table. We could blow in a bunch of fiberglass insulation in the spaces without flooring, and then build up a bunch of rigid board insulation on the floor, and lay a new layer of plywood on top of that to retain storage. All fine and good, in theory, but it’s already a short space, and to get a reasonable amount of insulation in there, we’d have taken up a lot of headspace, and therefore reduced storage space as well. I did not want to change the space, and it actually would have been a fair amount of mess, noise and labor to get all the material in there to insulate the floor. So, I elected to spray the roof deck with open cell foam.
That has not only helped stabilize temperatures throughout the house, it has eliminated the dread of going up into 140 degree heat to find the high chair, or the next set of clothes, for the baby in the house. And while we had to move our stored items, either out or into the center of the space for workers to get around, we didn’t have to take it all out (as we would have with the floor option), and we got to move most of it back (it was also an excuse to get rid of junk!). Plus, it eliminated the need to depend on a fan, or wind, or other air circulation to “cool” our attic in the summertime. Now that the space is defined as within thermal envelope, it simplifies its use, and makes it easier to manage the space. We don’t have to worry at all about air leaks through the ceiling anymore, because there’s an insulated lid at the roof.
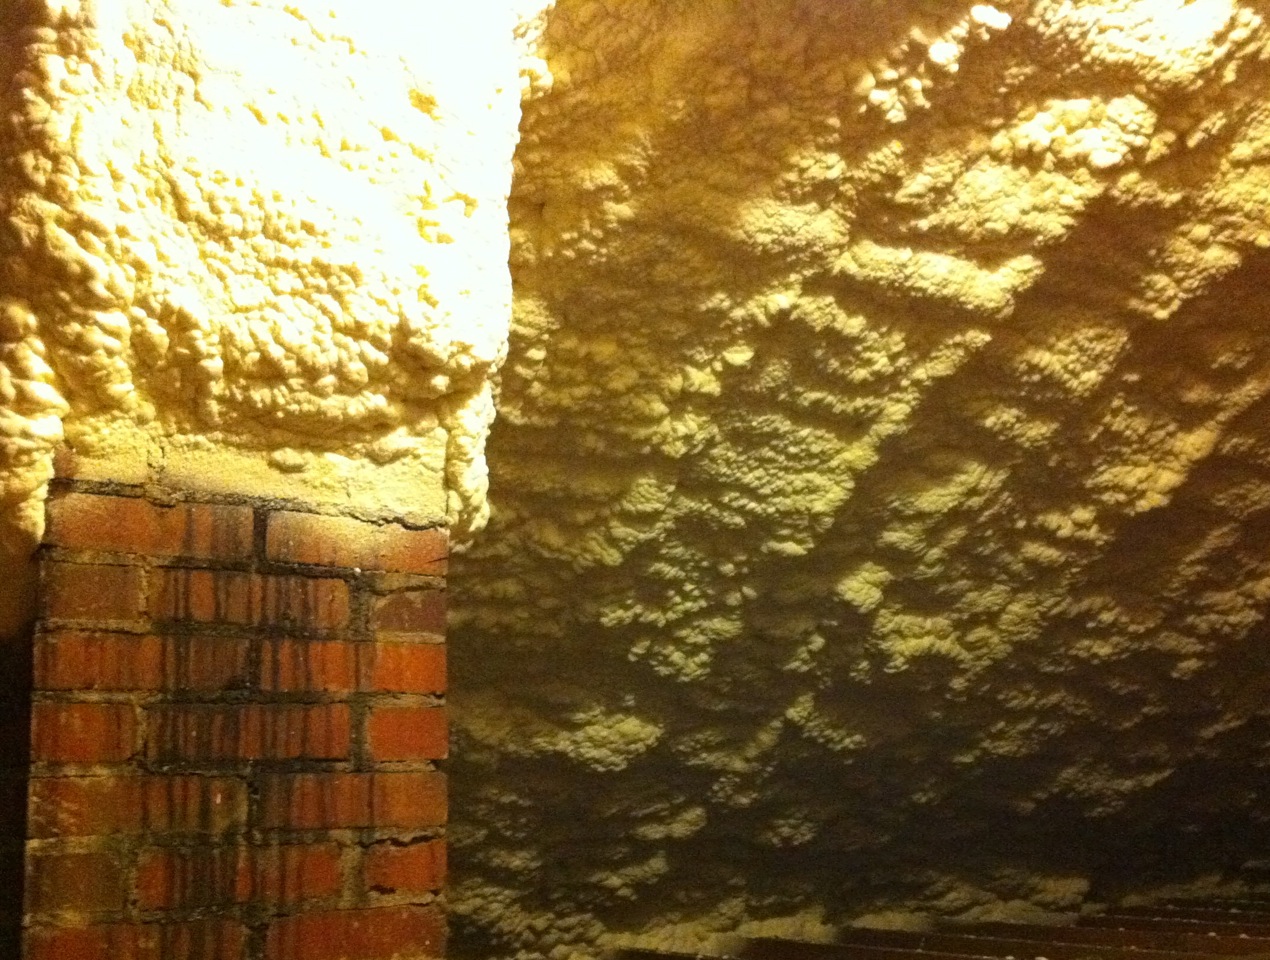
Bottom Photo: Attic after
Next item: ERV. Stay tuned!
Sunday, April 8, 2012
Making Our Home a Home Sweet Home: Part 6 – The Plan
I didn’t say it explicitly before, but have implied that our decision-making addresses the house as a system from the outside in. You can have some fancy equipment and appliances, or even insulation, but without an appropriately designed shell of the building even the best heating and air equipment can struggle (along with the occupants). Of course, under most circumstances, it may not be practical, or likely, that you’re going to rip out everything and start over (although it’s really exciting when you do get that chance!). But when you do make major changes, you need to consider how the behavior of the equipment will change, and its longevity as a result.
To be fair, too, there are some things that are not so inextricably tied to the skin. Some are more related to behavior, the energy load that results from lifestyle, preference and convenience of occupants, and can be done without too many impactful side effects, good candidates for do-it-yourself, or honey-do lists.
All things considered, here’s the plan, summarized. I broke them out into two categories. One that lists things that don’t require careful thought about how they impact the whole system (Non-integrated), and ones that do (Integrated):
Phase 1
Non-integrated
Install electric water heater blanket
Insulate pipes within two feet of tank
Install programmable thermostat
Replace washer with ENERGY STAR washer
Integrated
Install open cell spray foam underside of roof deck
Install variable speed ERV
Seal/reseal exterior doors
Seal exterior outlets
Seal crawl space with white reinforced liner
Determine method to insulate exterior walls
Install mechanical air supply to crawl space
Replace crawl space access doors with sealed and insulated doors
Future/Phase 2
Non-integrated
Replace fridge with ENERGY STAR fridge (that might be all too soon!)
Replace hot water heater with high efficiency water heater, or solar water heater
(Buy a minivan to replace the station wagon!)
Integrated
Remove exterior wall plaster or drill and pump exterior walls with spray foam or dense-packed cellulose
Replace shingles with ENERGY STAR related shingles
Replace gas pack HVAC unit with geothermal heat pump, or high SEER conventional heat pump
Details about key items to follow in future posts.
Wednesday, April 4, 2012
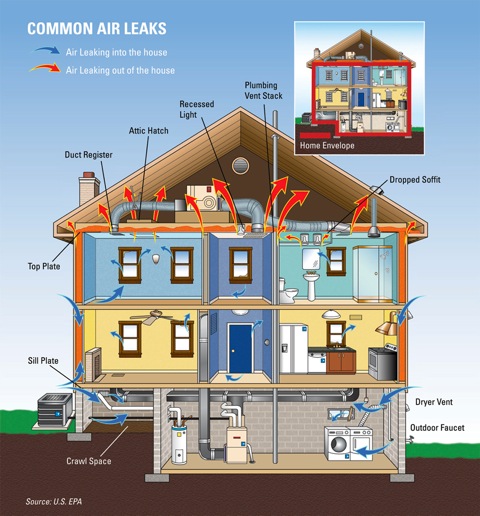
Making Our Home a Home Sweet Home: Part 5- Air Apparent
Last time I mentioned a bit about the progress of building shelters, first keeping larger critters out, then water—both ways of tightening up a home. Air is next. There are three reasons for this: moisture, temperature, and pollution. Air brings all these things, most often in rather different quantities than indoors, which adds a burden to the house, likely to its occupants, and also to its heating and cooling equipment. Conventional building wisdom has said, “a house needs to breathe.” This is technically true. But, then, ask: “How and when do you get fresh air?” Like the body, a clear opening (mouth or nose or vent) and a controlled pressure regulator (diaphragm or fan) lets you know. The air that comes into the body is tempered and filtered by the nasal passages so its contents are not so shocking to its more delicate and vulnerable interior: the lungs. In a home, mechanical ventilation can do this work. Like not breathing deprives lungs of fresh air, without this provision, air moves (or doesn’t!) unfiltered at the whims of wind and convection currents. Convection currents are caused by warmer air rising or cold air sinking. When air rises inside a home, it will find its way out the top, wherever it can, through the attic access, the light fixtures, or any other unsealed opening in the ceiling. By the general nature of air pressure, when air leaves the top of my house, it will be replaced by other air. Where does that air come from? Bad windows and poorly sealed doors, exterior outlets, and leaky floors allow outside and/or crawl space air to enter the house. This is unwanted, unhealthy, unpredictable, and uncontrollable airflow—better put a lid on it.
 To jump ahead a little bit, we decided to feed two birds with one scone and seal and insulate in one step with spray foam on the roof deck, and in our uninsulated back room (more on that, later). The Building Performance Institute recommends adding mechanical ventilation when tightening more than 15 percent of the exterior of a building, so with our spray foam decision, mechanical ventilation would provide a choice to maintain a healthy interior. The options were a bathroom exhaust fan on a timer (which requires repeated human input) paired with a passive and filtered vent opening through a wall to both exhaust and bring in an appropriate amount of air, or an Energy or Heat Recovery Ventilator (ERV, HRV), which can be set to run automatically. More on that decision soon!
Tuesday, April 3, 2012
Making Our Home a Home Sweet Home: Part 4 – If Only We Could Start Over
A house is a system. It is made up of separate systems that have unique functions, but, like we’re discovering in medicine, thanks to Patch Adams and many others, you do best when you treat the patient, not just the disease—the whole rather than the individual pieces. How the individual components interact with each other is critical in the overall success of an organism, or a building. Prescribing treatment for one ailment may cause side effects. Yet, both in home comfort improvement and in medicine, budgets (of money, time and tolerance) may limit the possibilities. We want the house to succeed—but more so for the folks who call it home. That takes thoughtful prioritization.
 Like an organism, the way a house interacts with its surroundings—what it lets in and keeps out, and when—determines its comfort, performance, and longevity. Like a body’s skin, the exterior of a home must manage water, moisture, air (and all that’s in it), temperature, light, sound, and even other organisms introduced by its environment. Bodies and homes need fresh air, fresh water, and a healthy amount of sunlight. The respiratory and digestive systems and skin are wonderfully capable of ensure healthy quantities of all of these, but, like a building, it requires proper user input. If not, we know what can happen. Some bodies are able to handle negligence better than others. Homes are the same way, and can easily be designed to control these elements. Or, redesigned, as best we can. If not, deterioration and discomfort move in.
So, if we can’t start over, we still have the chance to make what we have work better. For centuries, as human shelter progressed, keeping critters (the big ones) out was job one. After we got the hang of that, water was next. For some houses, it still is next. We all know if we have a leak in the roof how much more an emergency that is than an air leak! And, rightly so, because water is destructive.
But, once we get water out of the picture, air is next.
Saturday, March 31, 2012
Making Our Home a Home Sweet Home: Part 3 - Fixtures and Equipment
Around the time of the window replacement, our gas pack (a combination air conditioner and gas furnace) needed to be replaced. At that time, the contractor mentioned we didn’t need to bother replacing the ductwork, as it was R-4.2. I didn’t look into what that meant (as far as ENERGY STAR or other recommended performance programs) and just took his word for it. Later, after looking in my scary crawl space (see Part 2), I understand why he did not want to replace them or at least seal them. While he installed a new digital thermostat, it was not programmable. I also did not know to inquire about SEER and AFUE ratings (air conditioning and furnace efficiency ratings, respectively), so he just replaced it with whatever was on sale at the time.
A while back Duke was giving away low-flow fixtures to its employees (my wife Beth qualifies here), so we picked up a 2.2 gallon-per-minute showerhead. But, it still takes a good 20-30 seconds for hot water to reach its destination at any of our three fixtures. We have replaced all our incandescent bulbs with CFLs, but still have one halogen lamp. Reasonable LED torch style floor lamps are not readily available yet.
These are not uncommon circumstances. Ideally, of course, we’d address all these issues in one fell swoop. All the walls, roof and crawl space need (some, or better) insulation and air sealing, which would impact the load and therefore size of the HVAC equipment. We could use a more efficient water heating system, or at least a recirculating pump to minimize water use. We should replace all our appliances with ENERGY STAR rated ones.
I’m guessing our financial reality is like a lot of other folks. A lot of other responsibilities and commitments, with school debt, three kids, travel plans, the list goes on. But, we got to the point where how we feel at home became a real priority. The following posts will describe the pathway we took, and the thinking, and building science, behind it.
Wednesday, March 28, 2012
Making Our Home a Home Sweet Home: Part 2 – The State of the House
We moved into to our Durham bungalow in 2002. It is of 1940 vintage with a brick façade on the 24’ by 36’ original footprint. A 12’ x 22’ wood sided addition was added 10-15 years later off the back of the house, and vinyl siding covered the same years later. The home was drafty, inconsistent, and generally uncomfortable, in regard to temperature. When we first moved in the windows were hernia-inducing. By 2006, well before I was trained in existing home performance, we replaced them simply for the ability to open them and get fresh air and not necessarily for the energy improvement (which the new ones certainly provided). So new windows were in place when we started looking into our recent comfort improvements. (I’ll pause here to say that I have learned that replacing your windows may not be the best first step to improving energy efficiency or comfort in your home. The following discoveries in our home seem to confirm the same.) We have storage in the attic, but it’s a shallow space with hardly room to stand between the collar ties and rafters. Fetching stored kids clothes out of the attic was a trip to the sauna in summertime. The leaky access door provided a ready avenue of airflow. An interesting excuse for insulation had settled between the ceiling joists: some sort of black, sooty rock wool. The soffits lacked any venting. Two gable vents and a passive turbine vent were present. The hardwood floors above our crawlspace gave us frozen toes in winter. The crawlspace itself was a horrible dungeon; a cobwebby critter hotel full of allergen-rich air rising into the house through the floorboards. When we put a French door off the back room to the patio this fall (not an energy decision), we discovered the lack of quality and quantity of insulation in the addition. As it turns out, there was no insulation in the walls and only a six-inch layer of critter covered fiberglass batt insulation laid on the drop ceiling above. It was actually a welcome discovery, because we now knew why that space was so generally uncomfortable. This also helps to confirm the likelihood and unfortunate reality that there is no insulation in the plaster-finished walls of the original (brick) portion of the house.
 Pictured Above: The crawlspace. Typical by local standards including moisture, mold, cobwebs, and critters.

Monday, March 26, 2012
Making Our Home a Home Sweet Home: Part 1 - Home Sweet Home
Home Sweet Home. It’s pretty easy to read that phrase as cliché, passé, or as a slogan some potato chip maker might use to associate the taste of their potato chips with warm fuzzy feelings. I used to think all these things, until very recently, when my wife, Beth, and I decided to do some work at our house to improve comfort, health and performance. It’s actually been sort of transformational for me, making physical investments in this house. I’m buying into it, literally and figuratively. Into the house, and the place, the neighborhood, the town, for our marriage, our family, our home. It feels good.
See, we’re traveling people. We both were born on other sides of the planet, and made our way to a common hometown on Virginia. Our nearly ten years here in Durham is practically the longest either one of us has spent in one place, let alone one house. It has been a long process settling in here, but each year it feels more and more like home, especially with three little girls under the roof (when they’re not raising the roof!).
We’ve done some painting, made some minor interior changes over the years, but I didn’t really start to feel ownership in the place until we started making some significant comfort improvements. Sure, I have dreams (big ones) about designing and building a home for us someday. Who doesn’t? And, for crying out loud, I work at a design-build company, so the waiting strikes me each day as I view the delightful design work gracing the monitors around the office! Alas, it is not time, but we have warmed to our little Durham bungalow, and even a bit more, literally, with the recent work we have done. Bloom where you’re planted - Puttin’ down roots - Love the home you’re with. Choose your phrase, that’s what we’re doing!
What have I done, already, you ask? Great question. I’m a Home Performance Specialist after all. So, I put my work into practice on my own home. Over the next week or so, I’ll walk you through the former state of our home, the approach I have for generating decision making, and the decisions we made for our home and our comfort. Stay tuned!
 Pictured Above: Bradley, Beth, and the girls at home.

Saturday, February 11, 2012
Quite Possibly the Coolest Tool Ever
We no longer demolish at BuildSense. We deconstruct. What is the difference, you ask? Demolish equals knock it down and take it to the landfill. Deconstruct equals take it apart and sell it, use it, or recycle it. We often work with Habitat for Humanity deconstruction teams that resell the deconstructed materials at their Restore. The owners get a donation letter (tax day is coming up). Sometimes we directly reuse the materials. I have a serious pile of cleaned bricks at my farm for our upcoming house project (basement walls and columns) and a massive pile of old driveway concrete chunks that are slowly becoming retaining walls. But I digress.
The real point of this blog is to talk about the coolest tool ever. It is a de-nailer. This thing works like (and looks like) an air powered framing nailer in the reverse. You just slip the sleeve over the end of the protruding nail and squeeze the trigger. The offending nail pops out the other side (watch your toes). This radically speeds up the cleaning and de-nailing process for used lumber so it is ready for reuse. Nifty.
 Here's the link: http://nailkicker.com/joomla/
And no, I do not own stock in the company. Just a good idea for demolition done right: deconstruction, reuse, resale, or recycle.
The real point of this blog is to talk about the coolest tool ever. It is a de-nailer. This thing works like (and looks like) an air powered framing nailer in the reverse. You just slip the sleeve over the end of the protruding nail and squeeze the trigger. The offending nail pops out the other side (watch your toes). This radically speeds up the cleaning and de-nailing process for used lumber so it is ready for reuse. Nifty.

And no, I do not own stock in the company. Just a good idea for demolition done right: deconstruction, reuse, resale, or recycle.
Sunday, February 5, 2012
Reclaimed Water: No Gray Area
Building codes are written for public safety. Sometimes they are quite clear and logical, sometimes they aren’t. Typically, it is disastrous situations that result in code modifications. Townhome and row house fires brought about greater fire separation between units. College dormitory fires brought about a sprinkler requirement. Occasionally, the code comes out with strong initial prohibitions to unfamiliar systems. One such situation was the use of reclaimed rainwater.
Though collected and reclaimed rainwater has been used for human water needs since the beginning of time, it was an unfamiliar commodity when introduced into the commercial building realm. So much so that collected rainwater was lumped in with all “gray” water. Gray water is water that is gathered after running through your laundry, dishwasher, down your sink or shower drain. Since the code lumped together the collected rainwater and gray water, it was all required to be chemically treated and dyed for public safety means before it was delivered to irrigate your landscape or flush your toilet. This makes sense for the soapy water out of your drain, but should it be required to chemically treat water that fell from the sky because it was gathered in a cistern before it was delivered to the earth? Some municipalities even required far-fetched labeling measures including “Non-Potable Water” signage over the toilets and urinals. (A thoughtful requirement for dogs that can read).
Fortunately, logic has set in and the latest NC Code update has separated reclaimed rainwater requirements from gray water requirements. Gray water must still be chemically treated and dyed, while rainwater requires a much simpler process. At ClearSense Properties’ 502 Rigsbee Building, we have implemented a reclaimed water system to flush toilets and provide drip irrigation to the landscaping. Less than 1” of rainwater on the roof overflows the 3000-gallon cistern. The water runs through a heavy particle filter prior to arrival in the cistern. Cistern water flows through an additional series of micron particle and UV filters before distribution through two non-potable supply lines; one to the seven toilets in the building and the other to the exterior landscaping. No chemicals or dyes endanger our pipes and fixtures from long term wear, corrosion, or staining. A solenoid valve allows for back-up use of city-supplied water in the rare event that the cistern runs dry. We are installing individual line metering to monitor the non-potable and city back up water use. Calculations based on the low flow dual flush toilets and anticipating 1” of landscape irrigation per week reveals a reduction of over 60,000 gallons per year from city water supply. (Pictured Below: Exterior cistern at 502 Rigsbee during construction.)

Friday, January 20, 2012
ClearSense Update: Reuse – Big and Small
It recently occurred to me that in the midst of moving at a million miles an hour on this project, we have only been updating our BuildSense|Studio B “on the boards” and “under construction” facebook page with images of the new building during construction. This is truly unfair, because it is only half of the story. For those of you unfamiliar with Downtown Durham, you may not be aware that this building has had a previous life. Originally constructed in 1945, the one story masonry building served as a farm equipment and tractor service center. In the early 1970’s it became the “Tire King” and has been largely recognized as such for many years until they relocated up the road two years ago.
That’s where our story of reuse started. Though the building was filthy, dark, and dank, and reeked of old oil, we observed a masonry shell that had not endured significant cracking or damage after certainly settling and shifting to its maximum over 55 years. We were happy to know that we could reuse this existing structure to support the needs of raising the roof and adding a second story.
Interestingly, the decision to add a second story prompted numerous ideas for the best manner to achieve it. The roof was comprised of 2x10 wood joists supported by steel beams. While this certainly supports a typical residential floor load, the commercial loading requirement would have required additional joists and still flexed underfoot. Furthermore, the exposed ceiling would offer little for sound insulation from the first to second floors, nor have any fire resistance value. Some combination of insulation and gypsum board ceiling would be required. The topside would surely require an additional layer of plywood to smooth out the surface after the old membrane roof removal destroyed the existing underlayment. Then we would be required to finish the floor with a final floor covering. Is this all worth it; especially knowing that it would continue to have the 3” slope over 50 feet (the slope of the old roof)? The answer for us was “no”, and I am very pleased with the decision.
We removed all the old wooden joists and salvaged them on site. We installed new infill steel beams between the existing beams and columns and added a steel deck above. We poured a composite concrete slab from 5” to 8” in order to remove the slope. Additionally, it serves to structurally strengthen the existing steel and provides a structural diaphragm for the overall stability of the entire building. There is absolutely no bounce in the floor. It carries a one-hour fire resistance rating. It provides great sound insulation. Both the underside of the steel deck and the sealed concrete floors will serve as finish surfaces. The moral here is that sometimes striving to save certain items, though it emotionally feels right, is actually the wrong decision.
So how did we get back to feeling great about both the new concrete floor and removing the old joists? We stored the joists on site and have used them for infill framing and blocking for interior non-structural framing. Additionally, we have made use of them in a rather non-traditional manner by designing and building our new main staircase of the repurposed material. Members of our skilled team, including George Thorpe, Bradley Yoder, and Scott Metheny have been transforming the old lumber into a new feature. In a unique manner, the new stairwell will tell the story of the old building every time a visitor traverses the stairs. (Below, Scott stands on one landing laid out in the shop with treads in the foreground).

Saturday, January 14, 2012
ClearSense Building December Update
December saw lots of changes at the ClearSense building on Rigsbee Ave in downtown Durham. We started the month with the new steel frame, roof, and floor slabs in addition to what remained of the exterior shell of the original single story building. We are very pleased with our choice of roofing panel. The R-42 insulated metal panel is both super insulated and aesthetically pleasing on both surfaces. The underside will be the finished ceiling to the second floor interior space. (see photo below)

By the holiday break (at our required pace for this project, none of our team took much time off), one interior stair was roughed in, plumbing, mechanical and electrical systems were at 50%, storefront window frames were installed, and some of the second story siding work was completed. Most prominently, the wind turbines and photovoltaic array are up! (see photo of the ClearSense rooftop below) These systems combine for a rating of approximately 35.5 kW to power the building of just under 12,000 square feet. The turbines are quite prominent, practically a beacon of clean energy generation. We're very proud of them - are they the first building mounted wind turbines in Durham, in the triangle, in the piedmont? Please let us know. Unless someone tells us otherwise, we'll take credit for that as another of many "firsts" in our local building industry (see our website “Recognitions” page for more).

Our goal is that the building itself will be constructed to be approximately 50% more energy efficient than a typical existing commercial building of the same size and use and that the clean energy generation will provide approximately 37% of the remaining power needs of the building. Though our team only designs and builds energy efficient and certified "green" buildings, we were able to exceed our regular standard and install the clean energy generation systems with the help of a grant proposal accepted by the North Carolina Green Business Fund. We are very pleased to have established this relationship and thankful to the NCGBF for their assistance. Stay tuned for more on the innovative work at 502 Rigsbee Avenue.
Subscribe to:
Posts (Atom)